This guide covers what visual inspection actually is, what to look for, the main types and methods, a practical step-by-step process, the real challenges that undermine inspection programs, and how to build a more reliable approach — including how to reduce the defect load that inspection must catch in the first place.
Key Takeaways
- Visual inspection is a non-destructive method examining products for visible defects without altering them
- Acceptance criteria must be defined before inspection begins — not during it
- Structured checklists, reference samples, and consistent lighting are prerequisites — not optional
- Inspector fatigue and subjectivity produce measurable miss rates in high-volume environments
- Inspection is reactive by nature; upstream process control is what prevents defects from forming
What Is Visual Inspection in Manufacturing?
Visual inspection is a non-destructive quality control method that uses direct or aided sight to examine products, components, materials, and work-in-progress for visible defects, deviations from specification, or signs of damage — without altering the item being examined.
Two distinct forms exist, and conflating them creates compliance problems:
- General visual inspection — routine checks performed by operators and quality staff as part of normal production operations. No formal certification is typically required.
- Visual Testing (VT) — a formal NDT method governed by codes, standardized procedures, controlled viewing conditions, and certified personnel. ASNT describes VT as the simplest and most fundamental NDT method, but formal VT under ISO 9712 explicitly excludes ordinary unaided shop-floor checks from its certification scope.
Within a broader quality system, visual inspection is typically the first check applied. When surface examination alone is insufficient — for internal voids, subsurface cracks, or microscopic flaws — it works alongside complementary NDT methods: ultrasonic testing, X-ray, or magnetic particle inspection. Each method addresses a different detection depth: visual inspection covers surface-accessible defects, while ultrasonic and radiographic methods reach what no surface check can.
What to Look for During a Visual Inspection
Effective inspection requires inspectors to know exactly what they're looking for before they start. Without that structure, production pressure wins — checkpoints get skipped, findings go unclassified, and the inspection stops functioning as quality control.
Surface and Structural Defects
The most common physical defects to examine include:
- Cracks — surface fractures from machining stress, handling, or thermal cycling
- Scratches and dents — cosmetic or structural damage from contact or impact
- Burrs — rough edges left by machining operations
- Corrosion — oxidation or coating degradation (ASTM D610 provides a standardized rust assessment method for painted steel)
- Deformation — warping, distortion, or out-of-spec geometry
- Coating damage and discoloration — blistering, peeling, or heat-affected zones
Severity classification — critical, major, or minor — must be defined in the acceptance criteria before inspection begins. ASQ defines these categories as broad severity classifications that require product-specific definitions; there is no universal threshold that applies across all parts or industries.
Assembly and Component Accuracy
Inspectors verifying assembled products should confirm:
- All components are present, correctly installed, and properly oriented
- Fasteners are fully seated with no cross-threading or missing hardware
- Wiring and connectors show no fraying, pinching, or exposed conductors
- No foreign material — metal shavings, cutting fluid residue, dust, or moisture — is present inside assemblies
Packaging, Labeling, and Markings
Before product leaves the facility, verify:
- Labels are accurate, legible, and correctly positioned (product number, lot code, date code)
- Seals and carton integrity are intact
- Protective packaging materials are undamaged
- Compliance markings and certifications are correctly applied
Process and Workplace Conditions
Visual inspection extends beyond the part itself. Workstation cleanliness, tooling condition, machine guard placement, and visible housekeeping issues are all inspectable — and they're often early indicators of upstream quality risk before a single part is made.
Types of Visual Inspection in Manufacturing
Not every visual inspection serves the same purpose. Understanding the classification frameworks helps manufacturers apply the right inspection type at the right production stage.
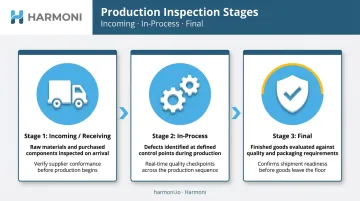
By Stage of Production
| Stage | When It Occurs | What It Checks |
|---|---|---|
| Incoming (Receiving) | On arrival from suppliers | Raw materials and purchased components for transport damage or non-conformance |
| In-Process | At defined control points during production | Defects at intermediate stages before they propagate downstream |
| Final | Before shipment | Finished goods against all quality and packaging requirements |
By Method: Manual, Remote, and Automated
Direct Visual Inspection (DVI) is performed by the human eye, sometimes aided by magnifiers, borescopes, or specialized lighting. It's the most common form and the baseline against which other methods are compared.
Remote Visual Inspection (RVI) uses cameras, borescopes, or robotic devices to access areas that are physically difficult or dangerous to reach — common in aerospace engines, energy equipment, and complex machined components with internal passages or cooling channels.
Automated Visual Inspection (AVI) uses camera-based machine vision systems and image processing algorithms to detect defects at production-line speeds. The global machine vision market is projected to grow from $15.83 billion in 2025 to $23.63 billion by 2030. AVI offers consistency and continuous operation, but it requires upfront integration work and well-curated training data to avoid false-rejection problems.
Two Additional Types Worth Knowing
The stage-based table above covers the production lifecycle. Two inspection types extend that model into supplier relationships and standards compliance:
- Pre-production / First Article Inspection — validates setup and initial output before committing to a full run; governed by SAE AS9102C in aerospace
- Acceptance inspection — performed by the customer or a third party to verify conformance before accepting delivery; ANSI/ASQ Z1.4 provides attribute sampling plans for this purpose
How to Conduct a Visual Inspection: A Step-by-Step Guide
Visual inspection only delivers consistent results when it follows a documented, repeatable procedure. Every step below should be captured in a standard operating procedure before the first part is ever examined.
Step 1: Define Acceptance Criteria and Inspection Scope
Before any inspection occurs, establish:
- What will be inspected — scope, product coverage, and characteristics to examine
- What constitutes conforming vs. non-conforming — based on engineering drawings, customer specifications, or applicable standards
- Frequency and sample size — 100% inspection, AQL-based sampling, or periodic audits
ISO 9001 requires that release records demonstrate conformity with acceptance criteria and traceability to the release authority. Defining acceptance criteria after inspection violates ISO 9001 requirements.
Step 2: Prepare the Inspection Environment
Physical setup directly affects detection capability:
- Adequate and consistent lighting (ISO 17637 specifies a 350 lx minimum for weld visual testing, with 500 lx recommended — confirm the applicable standard for your product and inspection type)
- Clean, uncontaminated inspection surface
- Appropriate aids: magnifiers, gauges, reference samples, boundary samples
- An organized workstation that minimizes distraction and contamination risk
Step 3: Perform the Inspection Using Standardized Criteria
Work through the product systematically:
- Follow a defined inspection sequence — don't improvise
- Reference the checklist at each checkpoint
- Compare against a golden sample or boundary samples where visual acceptance is subjective
- Capture photo evidence of any findings at the time of discovery
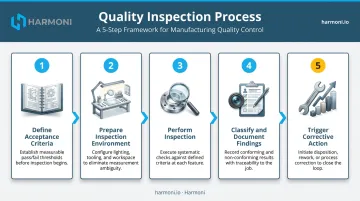
Step 4: Classify, Document, and Disposition Findings
Every non-conformity requires:
- Severity classification: critical, major, or minor
- Full documentation: defect type, location, photo evidence, and production context
- A disposition decision: accept, rework, reject, return to supplier, or request engineering deviation
Incomplete records undermine traceability and make audit responses painful. ISO 9001 guidance requires retaining nonconformity descriptions, actions taken, concessions, and decision authority.
Step 5: Trigger Corrective Action and Analyze Trends
Disposition decisions end the individual inspection event. What happens next determines whether your quality program improves or simply accumulates paperwork:
- Assign corrective action owners with clear deadlines
- Use Pareto analysis monthly or after high-volume production runs to identify the highest-frequency defect types
- Feed findings upstream to process engineers, not just quality files
- Verify corrective action effectiveness — don't assume it worked
Common Challenges in Visual Inspection — and How to Address Them
Even well-designed inspection programs break down at the same pressure points: inspector fatigue, inconsistent documentation, and the persistent tradeoff between false rejects and escaped defects. Each has known controls.
Inspector Fatigue, Subjectivity, and Inconsistency
Sustained visual attention degrades over long shifts and high-volume runs. A 2023 Applied Ergonomics study demonstrated that an improved viewing method achieved 92.1% defect detectability versus 73.4% for a conventional approach — and that the conventional method produced a statistically significant decline in visual acuity after just 30 minutes.
Without clear visual standards — defect catalogs, boundary samples, calibration exercises — two inspectors on different shifts may reach different pass/fail decisions on identical parts.
Practical controls:
- Implement inspector rotation schedules for high-attention tasks
- Use boundary samples for borderline conditions (the 2026 AIAG-VDA SPC Manual explicitly recognizes boundary-sample comparison for attribute data)
- Run periodic gauge R&R or attribute agreement studies to measure inspector consistency
Poor Documentation and Weak Traceability
The human-factor controls above only deliver value if inspection outcomes are captured accurately. Handwritten logs, inconsistent defect codes, and missing photo evidence make it nearly impossible to trace defects to their source, support corrective action, or demonstrate compliance during audits.
Baseline documentation requirements:
- Standardized defect classification codes used consistently across shifts
- Photo evidence captured at inspection time, not reconstructed later
- Records linked to specific jobs, lots, operators, and machine runs
- Retention periods that satisfy regulatory and customer requirements
The False Reject / Escaped Defect Dilemma
A 2018 Journal of Manufacturing Systems study modeling cast-metal visual inspection estimated 17.8% Type I error (false rejections) and 29.8% Type II error (missed defects) — figures the authors noted are facility-specific and require local validation.
The cost structure is asymmetric: false rejections waste labor and create unnecessary rework; escaped defects generate field failures, warranty claims, and customer relationship damage. ASQ's cost-of-quality framework places escaped defects in external failure cost (typically the most expensive category).
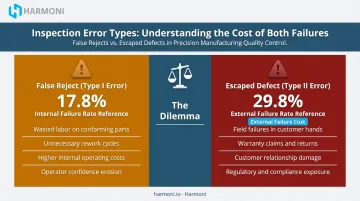
The most reliable path to reducing both error types is the same: well-defined acceptance criteria paired with calibrated inspectors and regular measurement system analysis. Without all three, tightening one error type almost always widens the other.
Beyond Reactive Inspection: Preventing Defects Before They Happen
Every inspection method shares one fundamental limitation: it's reactive. By the time inspection finds a defect, that defect has already been made. Inspection sorts output — it doesn't improve the process that generates it.
Truly high-performing manufacturing operations pair inspection with real-time process control that prevents defects from forming in the first place.
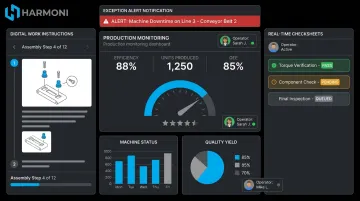
This is where shop floor orchestration platforms like Harmoni address the upstream conditions that create defect load. Rather than waiting for a downstream inspection to catch a bad part, Harmoni operates at the point of production:
- Digital work instructions and automated CNC program loading ensure operators work from the correct, current revision, eliminating the wrong-revision and wrong-program errors that are a documented root cause of machining defects
- Real-time digital checksheets gather in-process measurement data as each production cycle progresses, so both operators and managers can see a run going off-tolerance before it's too late to intervene
- Exception alerts push notifications to managers the moment deviations appear — enabling immediate response, not end-of-shift discovery
- RFID-based operator identification ties specific employees to specific jobs and machines, building the traceability needed for meaningful root cause analysis
The goal isn't to eliminate visual inspection — it remains a necessary quality safety net. The goal is to shrink the number of defects that reach it. Less defect load on downstream inspection means fewer escapes, fewer false rejections, and fewer resources consumed sorting output that should have been conforming from the start.
Frequently Asked Questions
What is visual inspection in manufacturing?
Visual inspection is a non-destructive quality control method that examines products, components, and materials for visible defects using the human eye or aided technologies such as magnifiers, borescopes, or machine vision systems. It can be applied at incoming, in-process, and final production stages without altering the items being examined.
What should be included in visual inspection?
A complete visual inspection covers surface and structural defects (cracks, burrs, corrosion, deformation), assembly accuracy (component presence, alignment, fastener seating), packaging and labeling integrity, and workplace conditions — all guided by a standardized checklist tied to defined acceptance criteria.
What are the 4 types of inspection?
Manufacturing inspection falls into four standard types:
- Pre-production / first article inspection — validates setup before a full run begins
- In-process inspection — checks quality at defined control points during production
- Final inspection — evaluates finished products before release
- Acceptance inspection — performed by the customer or a third party to verify conformance before taking delivery
What is the ISO standard for visual inspection?
No single standard covers all manufacturing visual inspection. Common references include ISO 17637:2016 (fusion-welded joint visual testing), ISO 5817:2023 (weld imperfection quality levels), and ISO 9712:2021 (NDT personnel certification). The governing code depends on your industry, product type, and contract requirements.
Can visual inspection detect all manufacturing defects?
No. Visual inspection is limited to surface-level or otherwise optically accessible conditions. Internal voids, subsurface cracks, and microscopic flaws require complementary NDT methods — ultrasonic testing, X-ray, coordinate measuring, or magnetic particle inspection — to detect reliably.
How does visual inspection fit into a broader quality management system?
Visual inspection generates defect data that feeds corrective action workflows, supplier feedback, and continuous improvement programs. Under ISO 9001, nonconformity records must document the defect, actions taken, and decision authority — making inspection records the input for root cause investigations and Pareto analysis, not an end in themselves.